Posts mit dem Label cozy werden angezeigt. Alle Posts anzeigen

Montag, 14. Oktober 2013

Striped Cozy Love


Nach meinem letzen Post über das Ipad Mini Cover, fiel mir ein dass ich vergessen hatte die erste Ipad Hülle zu bloggen. Also hier ist es :) 

Die ist ähnlich gemacht wie die einfachen Handy Hülle, außer das ich hier für den Aufladekabel eine Öffnung gemacht habe, und da es gestreift ist, ich jede Runde geschlossen habe und nicht wie bei amigurumi kontinuierlich gehäkelt habe, außerdem habe ich die mit halben Stäbchen gehäkelt.

After my last post on the Ipad Mini cover I realiced I hadn't blogged about my first Ipad Cover, so here it is. I used some Lana Grossa Cotone colors I had on hand, and made a small opening for the charger Cable in the bottom, so it can be charged yet be protected at the same time.

It's done using the same method as on my simple mobile phone cozy snuggle beside jumping over few chains to make the charger hole, and since I am doing it in stripes, I did close the rounds. It's also worked in hdc all the way. It´s simple yet practical and all those colors brightens up each day.


Die Öffnung für den Aufladekabel kann man hier gut sehen
The opening for the charger cable can be seen here. 


Hier sieht man den kleinen rausgucken :)
and here is the little fellow peaking out 

Hér er fyrsta Ipad slíðrið /Cozy sem ég heklaði, ég sá eftir síðasta póst að ég hafði steingleymt að blogga því. En ég er búin að vera að nota það mikið og sést varla á því, sem er mikið að þakka bómullinni sem ég notaði og elska Lana Grossa Cotone. Þar sé ég gerði rendur lokaði ég eftir hverja umferð með keðjulykkju, gerði þar að auki lítið op í botninum fyrir hleðslusnúruna, svo hann gæti verið verndaður líka í hleðslu. Litla slíðrið er líka með svona opi. :) Aðferðin er ekki flókin og er svipuð og á gemsa slíðrinu sem ég póstaði hér á blogginu fyrir nokkru og hefur notið mikilla vinsælda. Nema hér er ég að hekla í hálfum stuðlum í stað fastapinna. 


WIP


Dienstag, 8. Oktober 2013

Ipad Mini oder Kindle Fire Cozy


Eine selbst entworfene und gehäkelte Ipad mini oder Kindle Fire Cozy Hülle. Das erste mal wo ich Filz mit einarbeite in ein Häkelprojekt. Es hat Spaß gemacht die zu entwerfen und machen. Das Vorbild für die Hülle waren diese kleine Spielzeugtierchen mit den großen Augen. 

It is always fun to make something from an idea and sketch, this Ipad Mini or Kindle Fire cozy is one of those projects. I wanted to make a playfull kiddie cozy. As I did my Ipad cozy a while ago, and have been using it ever since and getting alot of compliments. I noticed that the loop I made for the button tends to get longer with the time. So on this one I used another method for the closing.

Hier eine Zusammenfassung von der Skizze zu vollendeten Produkt :). Um den Bommel wird der "Seil" gewickelt um zu zu machen, statt einen Knopf zu verwenden, da "Häkelseile" mit der Zeit tendieren länger zu werden.

Hoffe die Mädels von Creadienstag mögen es auch :) ich werde jetzt darüber hingehen und sehen was die anderen so gemacht haben heute :) 

The inspiration for the figure were these cute little dolls with the big eyes. I first made a sketch, then after the base cover was finished, I drew up the eyes and nose and cut it out. I decided to use felt, this is the first time I have used felt with crochet. I think it turned out good :)

On the back I made a pom pom where the closing chains wraps around it instead of using a button as I discussed above. 

Mittwoch, 7. August 2013

Cabled Coffee Cup Cozy


After I did my first knitted cable test piece a while back, I did this coffee cozy, but seem to have forgotten to blog it. It´s been in my purse ever since and oftly used, both for hot and cold drinks. It´s an every day reminder that I can knit and cable knitting is much easier than it looks.

Here is a pattern I made up using a knitting needle nr 4 and some merino wool I had in my stash

K = Knit
P = Purl
[RS] = Right Side, the side facing you
[WS] = Wrong Side, the back side of your work
C8R = slip next 4 stiches to cable needle and hold back; K4, then K4 from cable needle
R = Row

Start with casting on 20 stiches
R1: [RS] K4 - P2 - K8 - P2 - K4
R2, 4, 6, 8: [WS] K6 - P8 - K6
R3: [RS] K4 - P2 - K8 - P2 - K4
R5: [RS] K4 - P2 - C8R - P2 - K4
R7: [Rs]  K4 - P2 - K8 - P2 - K4

Repeat row 1-8 untill your piece is about 9 inch long, ending off after Row 1. It´s about 9 times, you have to repeat the Rows 1-8.

Cast of and leave a long tail, use this one to sew the ends together and snug it then on your coffee cup :) 

A really good way to learn and show off your first knitted cables.

Have fun and feel free to use this for your personal use, link me back please if you do one and leave me a comment with a link so I can see your version too :)

Deutsche Übersetzung

R = rechter Maschen
L = linker Maschen
[VS] = Vorderseite
[RS] = Rückseite

Anschlag: 20 Maschen

Der Zopf selbst umfasst stets 8 Maschen, umgeben von jeweils 6 vor und hinter dem Zopf. 

1. Reihe: [VS] 4R - 2L - 8R - 2L - 4R
2., 4., 6., 8., Reihe: [RS] 6R - 8L - 6R
3. Reihe:  [VS] 4R - 2L - 8R - 2L - 4R
5. Reihe:  [VS] 4R - 2L - [4 Maschen auf die Zopfnadel, (hinter die Arbeit legen) 4 Maschen rechts stricken, die Maschen der Hilfsnadel rechts stricken]* 2L - 4R
7. Reihe:  [VS] 4R - 2L - 8R - 2L - 4R

Wiederhol die Reihen 1 - 8, bis der Zopf etwa 23cm lang ist, oder so lang das er um einen Kaffebecher passt. Die letzte Reihe ist eine 1. Reihe, danach kannst Du die Maschen abketten. Lass etwas von dem Faden übrig, weil Du damit das zusammennähen wirst. 

Viel erfolg. Ich habe Merinowolle verwendet und Nadelstärke 4.

Íslensk þýðing

S = Slétt
B = Brugðið
[FH] = Framhlið
[BH] = Bakhlið
C8R = næstu 4 lykkjum eru settar yfir á kaðalprjón, og settar fyrir aftan stykkið, síðan eru næstu 4 lykkjur prjónaðar slétt, að síðustu lykkjurnar 4 sem þú geymdir á kaðlaprjónsprjóninum. 

Kaðallinn er myndaður úr 8 lykkjum með 6 lykkjur fyrir framan og aftan hann.

Byrjið á að fitja upp 20 lykkjur

1. Röð: [FH] 4S - 2B - 8S - 2B - 4S
2., 4., 6., og 8. Röð: [BH]  6S - 8B - 6S
3. Röð: [FH] 4S - 2B - 8S - 2B - 4S
5. Röð: [FH] 4S - 2B - C8R - 2B - 4S
7. Röð: [FH] 4S - 2B - 8S - 2B - 4S

Þessar 8 raðir eru svo endurteknar, og endað á röð 1, þar til stykkið er ca. 23cm eða nógu stórt til að ná utan um brottfaramál. Fella af og skilja eftir langan enda, sem þú saumar svo fyrstu og síðustu umferð saman með.


Thank you for taking your time to leave me a comment
Danke dass Du Dir Zeit nimmst mir Paar Worte zu schreiben
Takk fyrir að taka nokkrar mínútur í að skilja eftir línu

Sonntag, 14. Juli 2013

Picnic Time


my little sister sent me this picture of her packed picnic basket using two items I made for her the Owl Lunch Cozy and the apple cozy :) I love this picture and even if she uses these two items alot they still look new :)

Link to post for owl cozy is here and the apple cozy here 

Sonntag, 24. März 2013

TP Owly


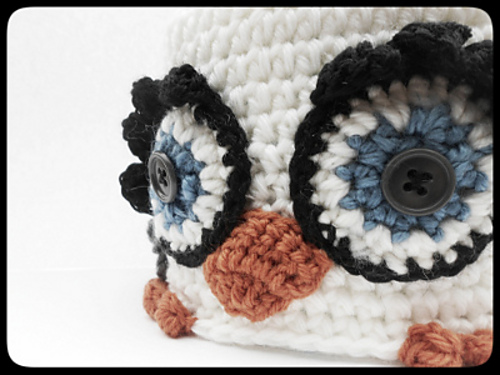
Meet your new friend in the bathroom - the TP Owly


Source: babble.com
You will never have to worry about this happening again 
with your new little friend in need, the TP Owly.

The pattern is from Soapy Sue and is just too cute for not to crochet. It´s a fast crochet project if you don't count the sewing part ;) The pattern has alot of pictures and is easy to follow for all levels of crocheters.

Changes made to original pattern: I used the pattern for the body, wings and eyes. The wings are probably the most  tricky part of the pattern though. The beak I did differently and the placement of the faceparts as well. On the feets, I skipped crocheting a row of chains first, but instead crocheted them directly to the last row of the body.

Full picture of the TP owl


Montag, 7. Januar 2013

Kitty Lunch Box Cozy


You might remember the Owl Lunch Box Cosy I made for my sister last year. Well at the same time I did a cozy for my Lunch Box, but didn´t finish it off ´til recently. Mine turned into this kitty :) She got a japanese face from Pierrot from their oven mitt pattern. To be able to hold it and so the cosy wouldn´t slip of, I added a chain of thicker yarn, that would be long enough to bind into a bow.

It really holds the food inside warm for a long time and I guess cold too on a warmer day. So it´s practical too ;)


better view from the top


Samstag, 10. November 2012

Apfeljäckchen - Apple Cozy

Apfeljäckchen mit extra Blatt (nach Anleitung in Mollie makes 1. Ausgabe)

Ich hab noch ein Blatt dazugemacht, damit alle Äpfel nicht nur ohne blaue Flecken auskommen werden sondern auch ein hübsches Blättchen haben.

Das Jäckchen ist schnell gemacht und schützt ein gewaschenes Apfel von allen unebenheiten in einer Tasche auf deinem Weg.


Following the pattern from the first Mollie Makes in German, this little apple jacket was born. I added a leaf to it as well, that I improvised myself. This way all apples that will be transported in this apple cozy will have a pretty little leaf as well and be free from all bruises it might otherwise catch along the way. Fast, easy and cute project to make.

An english version of this pattern from Mollie Makes was published in the guardian, klick here for the pattern (UK terminology)


Sonntag, 16. September 2012

Clever Cupcake - USB/Key Cozy


Small Project, finished within an hour.

Needed a cozy for a USB Stick. Made a cupcake with an open end. USB Stick is attached to a friendship bracelet that goes through the cupcake top and fastens on the one end to the USB stick, on the other end to a Kezchain, that I crocheted around as well. You could use this as a key cozy as well I guess.

Came out pretty well I think

Here more pictures


Keep Calm and have a Cupcake


Dienstag, 4. September 2012

Simple mobile phone cozy snuggle


Wanna make your own? Here is how I did it

Make a chain as long as the width of your phone. Crochet sc 3 rows, before you then start crocheting around, hiding your beginners tail as you go. Then it´s just sc around and around without closing your circles, untill the height of your piece fits your phone. Make a chain around 20 stiches in the back and fasten again with a slip stitch. I then crochetet another row of sc before fastening off.

Add a button fitting your yarn colour and volà you are done.

It´s better to have the button on the back of your phone to avoid too much stress on the screen.

When using your phone simply put your finger in the loop, so you wont loose your cozy.

wipped up in about an hour give or take few minutes. It´s a great project for beginners or those who want to use up some of that yarn laying around. I used merino wool and needle nr 4.

Some additional pictures to see the whole thing from the front and the back. 


front view

back view - here you can see * where I skipped 3 chains, as i did the loop, before fastening it with a slip stitch, and then crocheting a sc row all around before fastening it off.


Montag, 18. Juni 2012

Owl Lunch Cosy

Picknick in Viðey - Iceland

Crochet Owl Cosy for my little sister


start with the bottom, granny square in circle then dc all the way up and around, depending on the shape of your lunch box, decrease. Eyes are crochetet in a round and then the eylashes embroyded on. Nose is done making a half a circle then with dc and sewed on. I just made it up, so it's hard to tell exactly how I did it, but thought I would add it to the blog as inspiration and cuteness.

I'm using a lunchbox from roessle volumina (650ml, the second from left)